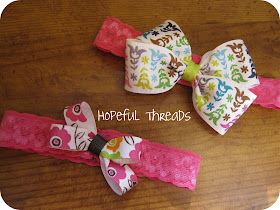
Today I'm going to share with you the way I make stretch lace headbands for the baby, as well as, an option for interchangeable bow clippies.
Gather these supplies:
Stretch Lace or Fold-over Elastic
Ribbon
Lightweight Wire or Thread
Clippie (optional)
Hot Glue/Glue Sticks
Click on images to see details larger.
Step 1: Loop the ribbon for your bow with print side out.
2: Make second loop of same size the same way in opposite direction.
3: For the third loop you will have to twist ribbon to keep print facing out.
4: Reverse side of bow showing twist. Repeat for subsequent loops.
5: Pinch loops in center of bow and secure tightly with wire or thread.
6: Wrap wire/thread several times to hold the shape of the bow secure.
7: Place a small dot of glue on center of bow.
8: Place alternate piece of ribbon across center to hide hardware.
To finish bow for headband just wrap alternate piece around, overlap and glue on back.
To make the Stretch Lace headband:
9: Cut desired length of stretch lace based on baby's head circumference. (I've used 14" for an average newborn.) Sew at raw edge with right sides together. I've sewn mine with black thread so you can easily see it.
10: Add a small amount of glue on right side of headband at seam.
11: Place finished bow on glue and hold for a moment while it dries.
Your headband is done and ready to put around a little, adorable head!
I love the softness of stretch lace or fold-over elastic for these, they are both perfect for baby's tender skin.
To make your headband so that the bows will be interchangeable clippies, follow these steps:
Make your bow as described above. Cover the clippie style of your choice with coordinating ribbon. Place a small amount of glue on the clippie. Then place the bow from Step 8 onto the clippie. Wrap center piece of ribbon around clippie and secure with more glue as shown below.

Make your stretch lace headband as described above.
Then follow these steps to create a headband with loop to hold clippie.
Step 1: With a small amount of glue, glue seam open on headband.
2: Cut an additional small piece of the stretch lace, enough to wrap around headband.
3: Glue one side of small piece of lace to underside of headband covering seam.
4: Wrap the piece around the headband and secure with another small amount of glue. This will hide the seam on the headband while creating a loop for your clippie to slide through as shown below.
Make additional bows to interchange with all that tiny wardrobe! ;)
One note...the weight of the clippie is better for an older baby, where the original headband above is best for newborns and smaller babies.
A darling, quick and easy addition to any tiny princess's layette!


Cute! Where you do typically buy stretchy lace?
ReplyDeleteeeeee! :) I'll be sharing tomorrow! Can't wait....it includes surprises! :)
ReplyDeleteCute! I will be having a hair clippie party at my house with some friends in Oct and this will be great to use!
ReplyDeleteComprehensive tutorial, Kristy. The bows on the headband look fabulous!!! What a great idea to have the loop on the headband to make the bows interchangeable.
ReplyDeleteLove how the bows are interchangeable! What a great idea! Thanks for sharing!
ReplyDeleteChristine
- ChrisW Designs
So cute! Love the big bows!
ReplyDelete