Saturday, August 31, 2013

August 2013 - Project Finale!!!

TODAY'S THE DAY!!!
This is the final day of our August Project to sew Pencil Pouches in support of Sew With Kids and the kiddos of Pine Ridge Reservation in South Dakota.

We currently have 97 Pencil Pouches and a variety of school supplies shared in our donation album. Can you help us reach 100 by the end of the day??? :)

Get all the details at the top of the side bar on the right of your screen. 
THANKS for all your generous participation this month!
Photobucket

Friday, August 23, 2013

Pencil Pouch Progress!!!

Just over 1 week of sewing for our August Project!

There is still plenty of time to sew up a Pencil Pouch or 2 in support of our efforts to help the kiddos of the Pine Ridge Reservation be ready for back-to-school. The pouches above were sewn using THIS FREE TUTORIAL. Additionally, you can find all kinds of easy to follow and FREE tutorials on my "Pouches" Pinterest board here. All styles are welcome!

Be Inspired by all the fabulous pouches that have already been sewn and added to our donation album here....AND....be sure to add pics of yours when done as well! :) We hope to easily exceed 100 pouches donated this month....I know we can do it!


Thanks for sewing along! 
EVERY. STITCH. MATTERS.
Photobucket

Wednesday, August 21, 2013

Product Review: Petite Press

 I recently got to try a Petite Press Portable Mini Iron and thought some of you might like to know about some of the great features it has. 

As you can see, it has a digital control pad on the top that allows you to adjust the settings to 4 different temperature ranges from 176-410 degrees. Yes....this little thing gets HOT!!!! We never had the settings at the highest temp and still got great results. The little light will let you know when it's ready, along with a beep, and it didn't take long at all to heat up. We first used it when my nieces were here, so we had 6 kiddos waiting to iron and sew, so that was kind of important! :)

The handle has comfort grips that also help you hold securely to the press while using it. 
It also has a stand that you can click down to prop the iron with the heated soleplate up when not in use.

I was VERY surprised and impressed with the crisp seam this little gadget created! No steam at all! 

 While I've only needed to use it with the head in the original position, the dial you see on the side allows the head of the iron to pivot and be secured in multiple directions. 

Another thing I really liked was how long the cord was....very, very long! Made it easy to use.
All in all, this is a product I was pleased with, will continue to use and was pleasantly surprised with how well it performed. It would make a great iron to take with you in your sewing bag for traveling or events outside of your home, and while I haven't yet used it for applique, I imagine it would work beautifully for that as well.
Thanks for letting me share! If you have any specific questions about it, I'd be happy to answer as best I can. Just email me

*I was provided this item free of charge. No additional monetary compensation was provided for this review. The opinions shared are my own.
Photobucket

Tuesday, August 20, 2013

The Runaround Pants by Fishsticks Designs - Jersey Love Blog Tour & Giveaway!

 
Today is my stop on the fun & comfy Jersey Love Blog Tour!
I'm so excited to share the fabulous new Fishsticks Designs Runaround Pants pattern I had the privilege to sew, using the scrumptious new knits from Riley Blake Designs!

I chose to make the Runaround Pants for my 6 year old son. He's always asking for pants/shorts with "no buttons or zips", and that's getting increasingly harder to find the older he gets. These not only perfectly fit the order, but they are stylish too!
Now, I think I should share up front that I'm not especially experienced sewing with knits. As a matter of fact, I tend to avoid it most often. I know....I need to GET OVER IT, especially considering that I have this really great friend that creates all kinds of wonderful sewing patterns using knits! 
I love knit fabrics.......everyone in my family loves wearing knit clothing.....but the stretch always throws me off and my machine often like to "eat" them. This pattern was so easy to follow and such fun to make, and this fabric so nice to work with, that they have seriously helped me to loose some of my apprehensions and even start looking for more ways to sew knits! YAY!!!!! :)

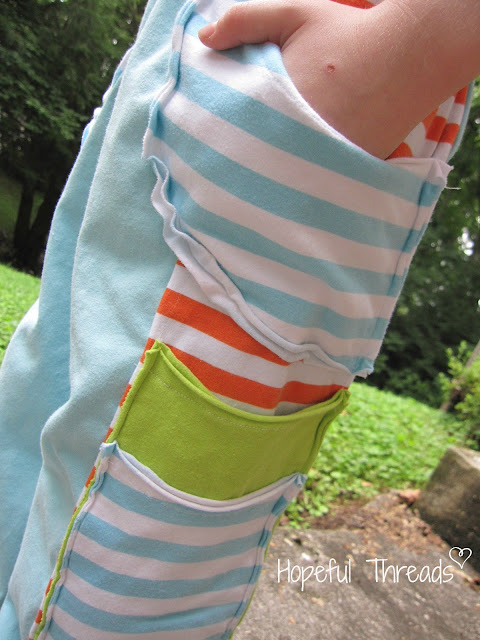
I absolutely LOVE the layers of these pants! They are easy to add since most edges remain raw, and the thickness of the multiple layers actually made them easier to sew for me.
 Pockets! Pockets! Pockets! 
My Lil' Guy immediately counted and began to fill all the pockets!
**MOM NOTE** Be sure to check ALL pockets before washing! ;)
 And the comfy, stretch waistband is right up his ally!
(Such a kissy tummy!)

If you are looking for a no-fuss, easy to wear and fun to sew pattern, you're going to love this one! Especially since it offers such unique ways to create a stylish and wearable garment for boys. 

Find the Runaround Pants pattern here.
Be sure to check out all the other incredible blogs on the tour! They are each sharing their own Jersey Love creations, and there might just be a few chances to win some of the awesome new Fishsticks Designs patterns! ;)
Be sure to join us for every stop on the Jersey Love Blog Tour!
Tuesday, 8/13: Call Ajaire & Rock the Stitch
Thursday, 8/15: Shaffer Sisters & Blue Susan Makes
Friday, 8/16: Rooibos Mom & Mama Says Sew
Tuesday, 8/20: Designs by Sessa & Hopeful Threads
Wednesday, 8/21: Making More with Less & Sew Can She
Friday, 8/23: Little Kids Grow & Max California

Oh! And if you'd like to WIN a copy of the Runaround Pants pattern, here's your chance! Just follow the Rafflecopter prompts below. Open to all!
Photobucket

Friday, August 16, 2013

Mid-Month Reminder!

I can hardly believe it, but it's here!
Time for our Mid-Month Reminder!
There's still plenty of time to jump in and sew along for our August Project, and we sure hope you do! We are making Pencil Pouches along with our friends at Sew For Kids to help the children of the Pine Ridge Reservation be ready for back-to-school!

You can get all the details on THIS POST, including links to free tutorials and shipping address. 
Thanks so much for caring and for being a part of our sewing outreach!
EVERY STITCH MATTERS!
Photobucket

Wednesday, August 14, 2013

Let's Talk Textiles - How to Mix Fabric Prints

 It's time for another "Let's Talk Textiles" entry from our friend Kim at Fabric Outlet. Today's topic, is one I'm excited to learn more about, how to mix fabric prints. Take it away Kim! 

Hello everyone! If you have ever wondered if there is a formula for mixing prints, there is! At least some guidelines and if you follow these you can mix prints as well as the top designers! First, decide on a main color that will run throughout the prints. Let's say your choice is red. Then find the "main" print you want. This should have curved lines like a floral. Then find a stripe or a geometric pattern with straight lines that has at least 30% of your main color or at least 10% of a couple of the secondary colors. Try to stay somewhat close to the same scale as your main print. You can bring in a few new colors as long as they are not predominant.  
Then find a third print that is of a different scale then either of the first two. Not crazy different but if you have 1/2" flowers and 1/4" stripes or chevrons then go with tiny pin dots or maybe 1" dots. Again, they should also be at least 30% of your main color or another predominant color color from your main print. At this point you don't want to try to blend in any more different colors. Too many colors will confuse the viewer just as too many of the same type of prints will.  
And that is why its good to follow some guidelines. You can certainly play with the guidelines, switch them around or add more prints using the same logic. Heres the thing, it is really fun to do this yourself rather than relying on finding the pre-coordinated sets from manufacturers. I have found that another guideline that works for me is knowing when to stop! Editing yourself is the best guideline to have in any type of design! 
***BONUS! Hopeful Threads Sewing Participants!*** I am offering a free zipper with each yard purchased this month to help you with your projects! Happy Sewing!

Thanks Kim! Great information and advice!

Find Fabric Outlet on Facebook Here.
Photobucket

Tuesday, August 13, 2013

2 Minute Pencil Pouch Tutorial!

Don't Blink!!! Or else you might miss this!
It's quick! Really, really quick!
READY????

Start with a piece of 9''x12'' pre-cut felt. Stores like JoAnn's and Hobby Lobby carry a wide selection of solids and prints.
 Fold the bottom edge of your felt up 4-5" and stitch the sides in place.
Mark where you'll be adding your snap closure, and cut a small piece of fabric to reinforce your snaps. If you'd like to use velcro instead, you'll want to measure and sew that on prior to stitching your sides.
Add your snaps and give it a test drive!

These are FAST, EASY and SUPER INEXPENSIVE to make, so why not make a few for our August Project and provide a Pencil Pouch for a kiddo heading back to school on the Pine Ridge Reservation!
Thanks in advance!
Photobucket

Friday, August 9, 2013

Sewing Essential - Tailor's Chalk

I must admit, I don't readily use Marking or Tailor's Chalk in my sewing. I've developed the habit of using washable markers with a house full of kiddos, since those are always readily available. ;)

However, when working with felt or in this case wool felt, especially darker colors, that just doesn't work well. I've read a lot of recommendations for using freezer paper, but it never seems to secure well enough to stay put for cutting the entire piece for me. So, I was surprised to find what will now be a Sewing Essential for me when working with felt, Tailor's Chalk.

This waxy chalk is easy to use, writes smoothly on the felt, and can be trimmed around or rubbed away once your piece is cut out. I've been on a bit of a doll prep/sewing spree of late, so I have broken in this new chalk very well. 

I will now keep it on hand if for no other purpose than this. 
Tailor's Chalk....easily accessible, inexpensive and perfect for felt. A new Sewing Essential for my "tool box". 

Check out my Sewing Essentials page at the top of the blog for a variety of other items I love to use in my sewing room. 
Photobucket

Wednesday, August 7, 2013

FLUFF Project - Doll Panel Donations from Stacy Iest Hsu Designs

 I was delighted when I was recently contacted by Stacy of Stacy Iest Hsu Designs and offered some of her incredibly ADORABLE and unique doll panels! Of course I JUMPED at the opportunity and had already had my eye on these darling Daphne panels, so didn't hesitate with my selection of which to send. 

The panels included step-by-step instructions for assembly, making them relatively quick and easy to create. 

I love all the special features too.....
Each one has an adorable hairstyle that perfectly fits their personality. 
The clothing colors and prints are precious!!!!
 And I think my absolute favorite part might just be her sweet shoes! :)
 The back of each doll also provides a place for personalization too. 

 These 4 girls join nearly 50 others stuffed friends and fill up the current box that will be delivered this week for the FLUFF Project!

I hope you'll take a minute to check out all the beautifully designed fabrics and panels in Stacy's shop on Spoonflower here, and drop by her facebook page to follow her here. Her delightful designs are some I expect to see grow and grow!
Photobucket

Friday, August 2, 2013

Fat Quarter Shop - GIVEAWAY in support of our August Project!

Let's kick off this August Project sewing with a fun FABRIC GIVEAWAY what do say???

Fat Quarter Shop is giving 1 lucky seamstress a Bear Country School Layer Cake! And this is PERFECT to use with this free Pencil Pouch tutorial that uses 10" squares. Quick & Easy and OH SO CUTE!!!
Look at all those fun  prints!
Who doesn't love the Berenstain Bears anyway!?!?!?

The purpose of this giveaway is to support the August sewing project, so with that in mind, you can follow the Rafflecopter prompts below to enter. 
Winner selected, announced & emailed 8/9/13 and provided 48 hours to respond and claim prize before an alternate winner is selected.

And GUESS WHAT!?!?!?!!
If you can't wait to get your hands on some of these adorable, scholarly prints, the WHOLE Bear Country School collection is 50% OFF in the Fat Quarter Shop!!!!!
Find all the cuteness and savings here!

Thank you so very much for your support Fat Quarter Shop!
Good Luck to all!
Photobucket
Related Posts Plugin for WordPress, Blogger...