Showing posts with label baby layette. Show all posts

Tuesday, July 1, 2014

2014 - 3rd Quarter Project Announcement

2014 is truly flying by! 
Don't know if it's our new quarterly schedule or what, but WOW!
Here we are with the kick off of the 3rd Quarter Project!!!

This is going to be another fun and simple to sew project that I hope many can and will participate in! With summer and back to school times falling during the 3rd Quarter, I wanted to be sure that sewing to share would be an easy thing to fit in, and I think we've found the perfect project!


If you know much about me from this blog or otherwise, you know that sewing for children is something very special to me. Using my love of sewing to help support and encourage a family, even more! 

Our family really appreciates living in a community that provides a Crisis Pregnancy Center to help struggling or surprised mothers and fathers prepare for their unexpected bundle. Being a large family, we understand the excitement paired with stresses, uncertainties and general feelings of being overwhelmed that planning for a new baby can bring....and we understand those feeling are all magnified when a pregnancy wasn't planned at the time. We also know full well the blessing a baby is to a family, and if we can be any part of the support and encouragement that shines light and hope on that, well, what a beautiful and encouraging opportunity for us as well! This is part of what makes us so very grateful for the active work and support of the Crisis Pregnancy Center.

Some of the incredible services provided by our local Center include free pregnancy tests, educational classes and training, a 24 hour  helpline, as well as, a care closet that helps provide everything from maternity clothing, baby/toddler clothing, diapers, formula, baby gear and more! All things that can help relieve some of the stress and financial pressure of an unplanned pregnancy.

For the 3rd Quarter Project, we will be making bibs, burpcloths and blankies to donate to our Crisis Pregnancy Center to be provided to the families they serve. I would like to encourage you to look within your own communities for a similar organization to directly support with your sewing this quarter, but will be more than happy to include any donations you'd like to send to go along with ours too. :) As always, if you don't sew and would like to send along store bought items, those are always welcome. Additionally, our family will be participating in the annual Walk For Life and any monetary donations received this month will be donated as part of our sponsor collections for the Center.
For those shipping donation items to me, your donations can be sent here,
Kristy Smith
c/o Echelon Florist
1260 Rocky Hill Road
Knoxville TN 37919

So, I welcome you to jump in a participate with our 3rd Quarter Project any way you feel led! You can find an abundance of Baby Sewing ideas, inspiration, tutorials and patterns on my "Baby Sewing" Pinterest board here. While I have chosen to narrow the focus to bibs, burpcloths & blankets to help simplify, any baby items you'd like to contribute are completely welcome! If you'd like to share photos of your donations to inspire and encourage the rest of us as we consider how best to participate, feel free to do so in our 3rd Quarter Project Donation Album on Flickr here.

I'll also be sharing about a new baby related project that I am humbled and blessed to be a part of. Watch for a special detailed post about that to come soon!

Email me here with any questions.
Thank you all for your continued support and enthusiasm as we care for others through our sewing machines. 
Every Stitch Matters.
Photobucket

Monday, November 25, 2013

Book Review - Sew Baby / Argyle Quilt

 While at Quilt Market, I came across the Fox Chapel Publishing booth. They had a couple of books I thought would be great for FLUFF Project sewing that I grabbed for my sewing library. I was also given this copy of Sew Baby to use for our Monthly Project sewing and share with you about. 

I decided to make the Argyle Quilt from the book for donation to our November 2013 Project

While I am a very experienced seamstress, I am a complete beginner when it comes to quilting. As in, I've made ONE quilt. :) The instructions and step-by-step photographs the book provided really did make this an easy project, and I had it complete from start to finish in only a few hours. Very pleased!

I chose a Riley Blake pre-cut stacker I had tucked away in my stash for a very long time, which made the whole project that much faster. This is exactly why I most often buy fabric without a specific project in mind and why I love keeping a certain amount on hand.....when the right fabric and pattern meet, it can make for such a fun project! 
 I also had this perfectly coordinating Riley Blake ribbon that made for a very adorable finish! I hope this sweet quilt fits perfectly the little one that receives it. I decided not to add an applique as the pattern included, but there are instructions included for that step in the book as well. 
 I backed it with a cozy flannel that had been donated as "bits of Binkeez" from Binkeez for Comfort and finished with a coordinating package of bias tape. 

This book is packed with all kinds of other wonderful baby sewing projects too! There are soft toys, bibs, burp cloths, hats and of course, the darling little slippers you see on the cover. The slippers alone include 3 different variations, 1 of which is a penguin which might just have to end up in my Lil' Man's stocking next month! ;) TOO CUTE!!! 

As a reminder....I know it's a holiday week and all, but it's also the FINAL WEEK of our November Project! Would love to have you join in and help us love on the babies of the NICU. I am getting so excited about making the special delivery of all of our beautiful handmade blankets & quilts! 
Photobucket

Thursday, November 21, 2013

Ruffle Trimmed Faux Patchwork Baby Blanket Tutorial

I made this sweet little blanket for our November Project and it was such a simple sew that turned out so pretty, I wanted to share with you in case you'd like to give it a try. This is a smaller blanket to accommodate the smaller sizes requested by our NICU. You can use the same method for any size you would like to make though. 

Simply measure 1 yard of fabric and cut in half the full length. 

Now, with my patchwork print pinned to a layer of batting, I began stitching across the patchwork squares to create a quilting effect. You can also stitch length wise to give it a real patchwork feel. I was going to wait and do this step at the end to incorporate the backing fabric into the quilting, but it wanted to bunch up since the borders were already complete, so I left it off.

To make your ruffle trim, I measured 4" x WOF (width of fabric) strips. For the size of blanket I was making, I needed 4 strips. Sew the short ends together to create one long strip. Iron seams open. Then, fold & iron the strip in half with wrong sides together. Now you are ready to ruffle your strip using your ruffling foot or favorite ruffling method, find my favorite HERE.  
Pin your ruffle evenly around the outer edge of your blanket matching up raw edges. Carefully round the ruffle at the corners if you would like your finished blanket to have rounded corners. Stitch or baste ruffle in place.
With right sides of patchwork fabric and backing fabric together, pin your backing in place. Stitch all the way around your blanket, leaving a 6-8" opening at the bottom edge for turning. Trim your seams, especially at the corners and turn your blanket right side out. I have used a soft, coordinating flannel print for the back of mine. 

Neatly push out the edge to make sure all is even. Pin the opening closed. Top-stitch around the entire edge of your blanket being sure to stitch closed the opening left for turning. 

There you have it! A precious little "Ruffle Trimmed Faux Patchwork Baby Blanket" perfect for gift giving or donation!  
 My finished blanket is approximately 24" x 38.5"

If you give it a try, I'd love to see! 
Photobucket

Tuesday, November 12, 2013

Baby Girl Gift Set with Babyville Boutique!

 I had so much fun creating these sweet "Cowgirl" sets to be delivered as part of our November Project donations! They are super cute and simple to make, so I thought I'd share a tutorial for those of you that might like to give it a try. Ready? 

I've started with some of the adorable new Babyville Boutique Ruffle Elastic and Ribbons.
 If you are making these for your own child, you will want to start by measuring her head, otherwise, a quick google search for "baby headband measurements" will provide some averages for you to work from. Once you've determined your size, cut the Ruffle Elastic accordingly and sew the cut ends together to create your headband. 
Next, you will make your bows. For mine I have used THIS TUTORIAL and made 2 bows for layering.
  
 Once your bows are secured together, cut an extra piece of the Ruffle Elastic 3-5" in length, and use this to tie the bow to the headband, covering the stitching. 

Now you are all set! Quick & easy huh? And fun to make! Find a little model to show off your creation and enjoy making another. :)

 Here's the second headband I made following the same instructions above. 

 Using some of the remaining ribbon and Ruffle Elastic, I also made a sweet security blankie to complete my donation sets. 

I rolled the little blankies and used the stretchy headbands to wrap around them. I hope the little Cowgirl Princesses that receive these, and their parents, love them! :) 

*****BONUS!!!!*****
Babyville Boutique is providing you with the chance to win your own surprise bundle of  their new ribbons and Ruffle Elastic so you can make your own adorable headbands! Simply follow the Rafflecopter prompts below to enter! (Open to US entrants)

a Rafflecopter giveaway
Winner announced and emailed 11/15/13 and provided 48 hours to respond and claim prize or alternate winner may be selected. Thanks!
See the great selection of Babyville Boutique elastics & ribbons at BabyvilleBoutique.com !
Thank you Babyville Boutique and good luck to you all!
Photobucket

Monday, October 15, 2012

Pattern Review - The Pod Swaddler by While They Sleep Designs

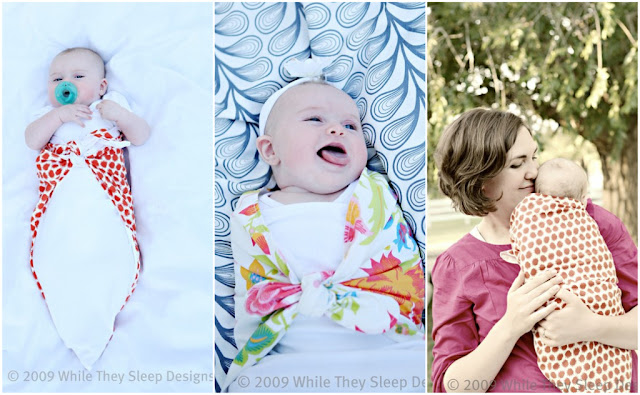
Hannah, from While They Sleep Designs generously provided her Pod Swaddler Pattern for my sewing this month. I have enjoyed making several of these for our October Project and know they will be useful for the mamas they are being sent to. 

Sewing The Pod Swaddler is quick and easy thanks to the tutorial and many photographs provided with the pattern! The tutorial is written like a lighthearted conversation with your friend, making for an enjoyable read for the experienced seamstress. :)

The pattern does require a large cut of fabric due to the finished project being a larger item, but she even provides suggestions on what she uses to help cut cost when sewing too. 

You can find The Pod Swaddler Pattern in her Etsy Shop here.
Baby can be swaddled with or without arms tucked in, allowing the swaddler to grow with baby. I love that it ties comfortably in front keeping baby warm and snug without unnecessary bedding that can sometimes be dangerous. Doesn't the little one pictured look so snug and content??? :)


SUMMARY
Sewing Experience Level: Beginner
Size Range: N/A
Special Techniques: None. Simple straight stitch is all it takes!
Pattern Format: PDF
Materials Used: Flannel for outer layers and fleece for attached blanket.
Personal Notes: I only wish I had one of these when my own children were babies! We wore the velcro out on several of the store bought wraps and they never seemed to hold snug enough for one of our sons who really liked being swaddled. 

Photobucket

Monday, October 8, 2012

The Pod Swaddler - PDF Pattern GIVEAWAY!

As Chance would have it.....(FYI I don't believe in "Chance").... :) I happened across an image on Flickr the week before our October project kicked off. One of my contacts had uploaded a picture of the most adorable and snuggly looking baby swaddler that I had to click on it to read more. Thankfully, she included a great description of the item she had made, including a link to the pattern she had used....love that! :) So off I went to learn more.

This is what I found...

I immediately knew this would be the PERFECT item for our October Project!

I emailed the designer, Hannah, and shared what we do here at Hopeful Threads and how I really thought her pattern would be perfect for our project, and she has generously offered to provide one of these adorable and easy-to-sew PDF patterns as a GIVEAWAY for one of you to win!

Simply READ and follow the Rafflecopter prompts for entry.

a Rafflecopter giveaway
Giveaway open to ALL based on qualifying entries as described above.
Winner to be randomly selected and announced here and emailed 10/15/12 and expected to respond within 48 hours to claim prize or alternate winner will be chosen.

I'll be sewing this adorable pattern this month too and look forward to sharing the sweet Pod Swaddlers I make for donation to our project. 

Thank you so much While They Sleep Designs!
Good Luck to All!

Photobucket

Thursday, October 4, 2012

Hat and Mitten Samples (and model!) ;)

The wonderful Lindsay from Craft Buds/Lindsay Sews has sewn up samples of the free T-Shirt Baby Hat and T-Shirt Baby Mittens, and well....her model was so adorable (regardless of the annoyed glare seen here), that I just had to share!!!
Hee hee! Poor, sweet kitty! ;)

These are the hat a mittens patterns from the book "Generation T - Beyond Fashion".


Remember! In support of our October Monthly Project, you can get the free Hat & Mittens patterns at CraftFoxes!

Be sure to stop back by tomorrow for your chance to WIN a copy of this creative book!
See you then!
Photobucket
Related Posts Plugin for WordPress, Blogger...